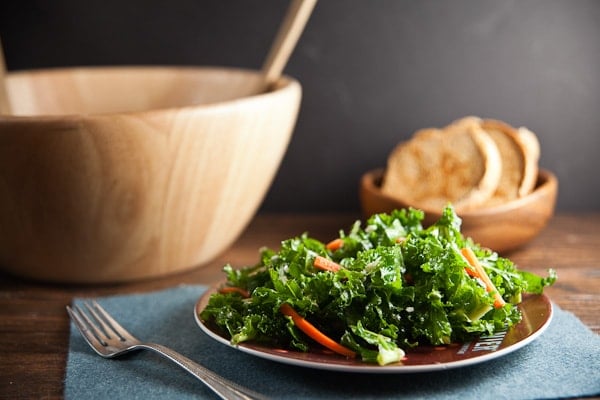
Monthly Archives: January 2013

Pesto + Salami Pizza

healthy-delicious_pesto pizza


Are we back?

You might have noticed that this site was having some pretty serious problems earlier this week and kept crashing. Unfortunately, blogging isn’t always as easy as taking a few pictures and writing a few paragraphs – there’s lots of complicated technical stuff behind the scenes and sometimes I have to figure it out as I go along. Long story short, I’ve tried to cheap out the past few years and use a low-cost server but, unfortunately, you get what you pay for and I outgrew what they could offer.  I moved everything over to a new company and hopefully everything will be running a lot more smoothly from here on out.  As an added bonus, everything should load a little more quickly too. I think it’s all back to normal now but if you notice anything funky going on, please let me know!

So… how about some pizza?


healthy-delicious_pesto pizza-3

This is my last recipe in the series that I’ve been doing with Pillsbury and this time I wanted to tackle the crust itself. I mean let’s face it – that naked edge of crust that you hold your slice by is pretty boring. It’s no wonder that generations of kids have left them behind or that pizza companies are always coming up with new gimmicks like stuffing it full of cheese or turning it into garlic knots. I decided to spice mine up with pesto. I covered the raw dough with a thin layer of basil-y pesto before par-baking it, then topped it as usual. It was super simple, but really perked the pizza up and made sure there was tons of flavor in every bite.

I also discovered a new way to cut pizza like this – it was kind of a lightbulb moment. Pillsbury crusts are rectangular, but I don’t like square pizza slices. They just aren’t right! I usually shape the dough into rounds, but then the piece end up kind of short and squat and aren’t really foldable. Solution? Cut long triangular slices across the pizza, stretching from one long edge to the other. You’ll have four slices from each edge (they’ll will fit into each other almost like teeth) and they’ll be wonderfully foldable and floppy. Just like pizza should be.


healthy-delicious_pesto pizza-2


Pesto + Salami Pizza
 
Prep time

Cook time

Total time


A thin layer of pesto baked onto the crust of this pizza means you’ll get tons of flavor in every bite! Salami and cherry peppers are a favorite topping in our house, but feel free to switch it up with whatever you like. I bet it would be delicious with lightly breaded pieces of eggplant and fresh mozzarella!
For the best results, look for a thick pesto that isn’t too oily.
Serves: 8

Ingredients
  • 1 can (13.8 oz) Pillsbury® Refrigerated Thin Crust Pizza Crust
  • 2 ounces prepared Pesto
  • ½ cup Marinara Sauce
  • 4 ounces shredded Part-Skim Mozzarella Cheese
  • 2 ounces thinly sliced Hard Salami
  • Sliced Cherry Peppers

Preparation
  1. Heat oven to 425F. Grease baking sheet. Unroll dough. Brush from edge to edge with pesto, covering completely. Bake 10 minutes or until crust begins to puff and brown.
  2. Spread marinara over pizza crust. Top with mozzarella and toppings. Bake 15 minutes. Let cool 5 minutes before slicing.

Sweet & Spicy Almonds

PicMonkey CollageI’m not usually a fan of almonds (or walnuts) but I’ve been sneaking handfulls of these sweet and spicy almonds all weekend. They’re totally addictive! The almonds are coated with a thick, crunch layer of caramelized brown sugar and cinnamon, with a hint of spicy cayenne – so, so, so good. They’re also ridiculously easy to make… which could be dangerous!

It warmed up a little this weekend, so I decided to make some simple salads to go along with the pizza we had for dinner. I topped some spring mix with diced pear, blue cheese, and these almonds and dressed them with blackberry-ginger balsamic vinegar and olive oil. They stole the show. If you topped the salad with some chicken, it would make a wonderful entree.

It might sound weird, but the almonds also have a breakfast cereal type of a flavor going on, an I think they’d be fantastic in granola or chopped and added to bran flakes. Of course, you can also eat them out of hand as a great snack.

The original recipe for these comes from Cyndi, over at Cookin’ With Cyndi. I was paired up with her for this month’s Secret Recipe Club and, although her cooking style is much different than mine, she she a lot fo fun looking recipes. Cyndi is a rockstar when it comes to planning ahead and spends a lot of weekends making meals that she freezes. Be sure to check out her blog for loads of low-carb recipes and look after the jump for more recipes from this month’s Secret Recipe Club participants.

healthy-delicious_sweet and spicy almonds-4

Sweet & Spicy Almonds
 
Prep time

Cook time

Total time


Almonds can be found in a few different parts of the grocery store, and the prices can vary drastically. I’ve found that it’s best to steer clear of the nuts in the snack aisle – the best deals can be found in the baking aise (usually near the chocolate chips).
Serves: 12

Ingredients
  • 1 Egg White
  • 1 tablespoon Water
  • ¼ cup Light Brown Sugar, packed
  • ⅓ cup White Sugar
  • 1 teaspoon Kosher Salt
  • 1 teaspoon Cinnamon
  • ¼ teaspoon Cayenne Pepper
  • 6 ounces Whole Almonds

Preparation
  1. Heat oven to 300*F. Line a baking sheet with a silicon mat or a piece of parchment.
  2. In a medium bowl, beat the egg white until foamy but not stiff – 10-20 seconds using a hand-held egg beater. Stir in the sugars, salt, cinnamon, and cayenne pepper. Add the nuts and stir until coated. Pour onto the baking sheet and spread out into a single layer.
  3. Bake for 30 minutes, stirring once or twice as the nuts cook. Remove from the oven and cool at room temperature for at least one hour. Break up the nuts before serving.
  4. Stor in an air-tight container at room temperature.

 
3 Points+.
Nutrition Information is an estimate and may vary based on brands used.

(more…)

Baked Eggs in Spicy Sauce

healthy-delicious_eggs in spicy sauce

So… winter’s here, huh? When I went out to my car yesterday morning, it was 3 degrees. Three! And that was before the windchill. Unacceptable.

This weather makes me want to curl up in a blanket, drink buckets of hot tea, and watch Law & Order reruns all day. Things I don’t feel like doing? Getting dressed, leaving the house, and cooking. To be honest, I don’t even really feel like eating… unless I’m handed something steamy hot and spicy, cheesy, or creamy.

I made these baked eggs last weekend, and they’re perfect for this time of year.  The eggs are poached in spicy tomato sauce and garlicky spinach until the yolks are deliciously creamy and the sauce is piping hot, then topped with just enough feta to add a little saltiness. Be sure to have plenty of warm bread on hand, because you’ll want to sop up every last drop of sauce.

A word of warning though: once you try these, they’ll be the only thing you want to eat.

healthy-delicious_baked eggs in spicy sauce-4healthy-delicious_baked eggs in spicy sauce-3

Baked Eggs in Spicy Sauce
 
Prep time

Cook time

Total time


The flavor of this dish really hinges on the sauce, so be sure to use a good one. If you happen to have homemade sauce, now would be the perfect time to break it out. I don’t have the patience to make good sauce so I use Victoria’s brand Fra Diavlo, which has a great flavor and is easy to find.
I use 3 cup ramekins for this because they’re the best size that I have. They’re a little larger than necessary and the deep shape means the egg will take a few extra minutes to cook. If you use smaller dishes, start checking your eggs after about 8 minutes.
Serves: 2

Ingredients
  • 1 Tablespoon Olive Oil
  • 1 Clove Garlic, smashed
  • 2 cups Baby Spinach
  • 1-2 Tablespoons Water
  • 2 cups good-quality Fra Diavlo Sauce
  • Crushed Red Peppers
  • 4 large Eggs
  • Cracked Black Pepper
  • 1 ounce Feta Cheese, crumbled
  • Warm bread for serving

Preparation
  1. Heat oven to 350*F.
  2. Heat the olive oil in a medium skillet set over medium-high heat. Add the garlic and cook 2-3 minutes, or until fragrant and beginning to brown. Add the spinach and water. Stir, then cook until just wilted.
  3. Ladle ½ cup sauce into each of two 3-cup ramekins or small, oven-safe bowls. Stir in the spinach; top with remaining sauce. Season to taste with crushed red pepper, if desired.
  4. Carefully crack 2 eggs into each ramekin (to be safe, crack into a saucer first to prevent broken yolks). Season with black pepper. Bake 15-20 minutes, or until the egg white are just set. Sprinkle with feta; broil 3-5 minutes or until the cheese begins to brown and the eggs are cooked to you liking.
  5. Serve with warm bread to sop up the extra sauce.


8 Points+.

All nutrition information is an estimate and may vary based on the brands of ingredients you use.

Kale Salad with Blue Cheese + Pickled Carrots

healthy-delicious_kale salad with blue cheese-2

When you go out to eat, do you ever get into a rut where you always order the same thing? I’m definitely guilty of that – especially at the City Beer Hall. We eat there relatively frequently, and I almost always get the 518 burger, which I’ve deemed the best burger in town.*  The last time we went though, I was craving something a little healthier and ended up getting the kale salad.

It was love at first bite and I couldn’t shut up about how delicious it was. I was still thinking about it days (and weeks) later and knew that I’d have to try making it myself.

healthy-delicious_kale salad with blue cheese-4

The salad is really simple, but the flavors are absolutely perfect together: it’s just kale, blue cheese, pickled carrot, and a balsamic vinaigrette. The Beer Hall also adds some cooked Farro and a little bit of lettuce (or maybe it was spinach) to theirs, which added some nice texture, but I skipped both because 1) I’m lazy and 2) I’m cheap and did’t feel like buying two kinds of greens. (I also used about 90% less blue cheese.)

Really though, this salad is all about the pickled carrots. They’re a little bit sweet, a little bit spicy, and are like little rays of sunshine that brighten up the earth kale. Even if you don’t like the idea of the salad, I urge you to make these carrots. Actually, make a double or quadruple batch of them – they keep well in the refrigerator and are great on all sorts of salads, with noodles, and on their own as a little snack.

I served this as a simple dinner with some garlic bread. We demolished that salad and left almost all of the bread uneaten.

* I know, I’m just as surprised as you are that a place that gives away free pizza with every beer and has a mechanical bull also has one of the best menus (featuring local ingredients, too!) in town. I guess you can’t judge a book, or a bar, by its cover. As for the second best burger in town? I say The Point, but Shawn is torn between them and New World. 

healthy-delicious_kale salad with blue cheese-3


Kale Salad with Blue Cheese + Pickled Carrots
 
Prep time

Cook time

Total time


The gingery pickled carrots are the highlight of this simple salad. They only take a few minutes to make, but ar even more delicious if you make them ahead of time and refrigerate them in the pickling liquid overnight.
I also liek to save time by buying a big bag of chopped kale, which is usually very cheap, rather than taking the time to remove the center stalks and chop it on my own. One big bag will make about 4 dinner-sized salads.
Serves: 2

Ingredients
  • ¼ cup Rice Vinegar
  • 1-inch piece of Ginger, peeled and shaved into thin slivers
  • 2 Carrots, cut into matchsticks
  • 6 cups Kale, center ribs removed and torn into bite size pieces
  • 3 Tablespoons Olive Oil
  • 3 Tablespoons White Balsamic Vinegar
  • 2 ounces Crumbled Blue Cheese

Preparation
  1. Put the rice wine vinegar, ginger, and carrots into a small pot set over medium heat; bring to a boil. Remove from heat and allow to cool to room temperature, about 15 minutes.
  2. Remove and discard the tough center ribs from the kale; cut or tear the leaves into bite-sized pieces and put in a large salad bowl. Pour the olive oil and white balsamic over the kale; toss a few times so that the leaves are coated. Let site 10 minutes to allow the kale to soften.
  3. Just before serving, drain the carrots and discard the ginger. Toss the kale with the carrots and blue cheese.


Mini Apple Cinnamon French Toast Casseroles

mini baked french toast

I know I’ve said it before, but I’m really not big on breakfast. I mean, I love it… but I love sleep more. I’d rather spend an extra 10 minutes in bed and grab a yogurt or a muffin to eat at my desk than make myself some toast or an egg.

I wasn’t planning on posting a breakfast – or a baked good – again so soon, but I made these mini apple cinnamon french toast casseroles on Sunday and I couldn’t wait to share them. I’ve been eating them for breakfast all week – all they need are 30 seconds in the microwave! The maple syrup is baked right in, so you don’t need to top them with anything extra. (Although a little cream poured over top? Heaven.)

healthy-delicious_mini french toast casserole

These casseroles are also really easy to make: just tear some soft white bread (I use dinner rolls) into cubes, combine them with a spiced custard and diced apples and refrigerate it overnight (or in my case, all Sunday afternoon and evening).  Top it off with some maple syrup and brown sugar so that the tops get all caramelized and yummy, then bake. The result is rich, eggy french toast that’s perfectly portioned out and ready to grab and go!

healthy-delicious_mini french toast casserole-2

Mini Apple Cinnamon French Toast Casseroles
 
Prep time

Cook time

Total time


These mini apple and cinnamon french toast casseroles are simple to make, but they’ll need to sit overnight so plan ahead!
As these bake, they’ll puff up like souffles (a good inch or two over the edge of the pan) but they’ll settle back into themselves as they cool.
Serves: 9

Ingredients
  • 4 large Eggs
  • 1 cup Fat Free Evaporated Milk
  • 2 tablespoons Maple Syrup
  • 1 teaspoon Vanilla Extract
  • ½ tsp Cinnamon
  • ¼ tsp Nutmeg
  • dash Cardamom
  • dash Salt
  • 6 ounces Soft White Bread, torn into 1-inch pieces
  • 1 Apple, diced
  • ¼ cup loosely packed Brown Sugar
  • 2 tablespoons Maple Syrup

Preparation
  1. In a large bowl, whisk together the eggs, milk, 2 tablespoons maple syrup, vanilla, cinnamon, nutmeg, cardamom, and salt until light and frothy. Add the bread pieces and apple; toss several times to coast well. Cover and refrigerate overnight.
  2. Heat oven to 350*F. Butter 9 muffin cups. Give the bread mixture of good stir to incorporate any liquid that has settled, then divide between the prepared cups.
  3. In a small bowl, mix together brown sugar and 2 tablespoons maple syrup until it resembles wet sand. Drizzle over the top of the muffin cups. Bake for 20 minutes, or until puffy and golden brown.
  4. To release, run a knife around the outside of each muffin cup. Gently pry the casseroles out with a spoon.


Bakery Style Raspberry-Chocolate Chip Muffins

healthy-delicious_bakery style muffins

I’ve had it with puny little homemade muffins that barely fill their liners and take 2 bites to eat. When I want a muffin, I want an oversized bakery-style treat that’s soft and fluffy with a big, golden brown top – and I want to eat it for breakfast without feeling guilty.

These raspberry-chocolate chip muffins definitely fit the bill. They’re stuffed with all sorts of good stuff like fresh berries, dark chocolate, oats, and tangy Greek yogurt, and crowned with delicious streusel.

healthy-delicious_bakery style raspberry chocolate muffins-2

In order to perfect these treats, I had to do a lot of research on muffins – baking is a science, after all, and even tiny tweaks can results in an end products that’s dense, flat, or a flat out disaster. I found that the best muffins had a few things in common: lots of leavener, thick batter, and a very hot oven.

With those guidelines in mind, I set out experimenting with ways to reduce the fat (subbing out some butter for plain, nonfat greek yogurt which also had the added bonus of giving them a pleasant cheesecake-like tang), add protein and fiber without sacrificing flavor (I didn’t want whole wheat muffins; freshly ground oats made a great supplement to all-purpose flour), and make them practically fool-proof (make sure to grease the tops of the muffin tins – those overflowing tops have a tendency to stick!)

healthy-delicious_bakery style raspberry chocolate muffins

Bakery Style Raspberry-Chocolate Chip Muffins
 
Prep time

Cook time

Total time


These raspberry-dark chocolate chip muffins have large, overflowing tops, just like the ones from your favorite bakery!

You can find oat flour in the natural section of your grocery store, but I made my own by processing old fashioned oats in the food processor. A heaping cups of oats yielded enough flour – with a little to spare.

I like to use fresh berries, but frozen will work just as well. You can also save yourself about 50 calories by skipping the streusel topping, but I like the little bit of extra sweetness that it provides.

Serves: 12

Ingredients
  • 2 cups All Purpose Flour
  • 1 cup Oat Flour
  • 4 teaspoons Baking Powder
  • ½ teaspoon Baking Soda
  • ½ teaspoon Salt
  • ¾ cup Sugar
  • 10 ounces (about 1⅓ cups) Fat Free Plain Greek Yogurt
  • 5 Tablespoons Butter, melted
  • 2 room temperature Eggs
  • 1 teaspoon Vanilla Extract
  • ¾ cups Raspberries
  • ½ cup Dark Chocolate Chips
Streusel Topping
  • ¼ cup All Purpose Flour
  • ¼ cup Butter
  • 2 Tablespoons Brown Sugar

Preparation
  1. Preheat oven to 400*F. Line a 12-cup muffin tin with paper liners; grease the top of the tin with a little oil or butter.
  2. In a large mixing bowl, sift together the flours, baking powder, baking soda, and salt. In a second bowl, whisk together the sugar, yogurt, melted butter, eggs, and vanilla. Pour the wet ingredients into the dry ones; mix until just incorporated – do not overmix, the batter will be very thick. Fold in the berries and chocolate chips.
  3. Divide the batter between the prepared muffin cups (the batter will mound above the rim of the pan.) In a small bowl, use a fork to mix together ¼ cup flour, ¼ cup butter, and 2 tablespoons brown sugar until crumble. Crumble the topping over each muffin.
  4. Bake for 20-25 minutes, or until the tops are golden brown and springy. Allow muffins to cool at least 15 minutes before removing them from the pan.


Next Page »