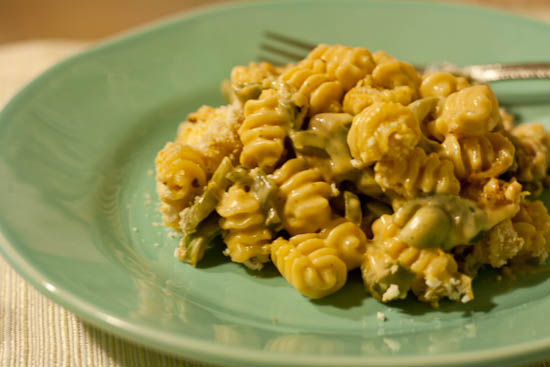
Monthly Archives: September 2011
Chickpea and Wild Rice Mulligatawny & Lunch Wars
| September 29, 2011 | Posted by Lauren Keating under Fall, Indian, Quick Weeknight Meals, Reviews, Soups and Stews |
I finished reading Amy Kalafa’s book, Lunch Wars, a few days ago. The book is about improving the food served in school cafeterias, and it was impossible not to think about my own school lunches as I read. In elementary school, I always felt bad for the kids who had to eat the hot lunch, which was absolutely disgusting.
I remember one time I forgot my lunch and had to get the spaghetti. It was mushy and tasted like can. I sat there and cried, refusing to eat any more after the bite. Back in those days, at least in my school, there weren’t a lot of options in the cafeteria. You got whatever the lunch that day was and, if you were lucky and had an extra quarter, maybe you’d get an ice cream sandwich.
But by high school, things changed. There were nachos. And pints of Ben and Jerry’s ice cream (Yes, pints. I don’t know what they were thinking!) One year, a local pizzeria ran the kitchen and the only food available was pizza. Every day. Seriously? With the exception of the pizza year, I have no idea if there was a traditional hot lunch option. If there was, no one ever got it. Why would they? The junk food was good, and that spaghetti was nasty.
So I had high hopes for this book, which was described as a guide to improving school food and “winning the battle for our children’s health.” Well, I really wasn’t a fan. I almost stopped reading midway through the first (seemingly never ending) chapter.
To me, Kalafa just seemed like a pissed off mom that found out her daughter was throwing out her packed lunches and buying candy instead. She spouted off facts with no footnotes or credentials and, in at least one case that I happen to have personal experience with, either deliberately exaggerated or got her facts wrong. At one point she complained that cafeterias should only serve organic chicken. I literally laughed out loud. Who did she expect to pay for that? I hear at least one person a day complain about their taxes; I don’t think I’ve ever heard anyone complain about the lack of organic chicken in their kid’s cafeteria. Would it be nice? Yes. Is it realistic? No. She does concede that eventually, but I think it was in chapter 3.
Honestly, I think the book would be better if she deleted the whole first chapter. If you’re reading the book, chances are you don’t need to be sold on the idea of improving school lunches. She oversold, to the point of making me think she was a little nuts. The overly political tone really turned me off (and I like politics!).
The book did get better, and I’m glad I stuck with it. It wasn’t much of a guide (her advice can be summed up by two words: be involved) there were a lot of interesting stories and anecdotes. I liked reading about what some school districts are doing – from having students tend a garden and grow fresh vegetables to be used in the cafeteria, to joining forces with local farmers, to the school chef who made and sold soup at the local farmer’s market to raise money for better ingredients. It gave me hope that things can improve, at least in the wealthy districts that she mainly wrote about. Honestly, this book was ok and parts of it were enjoyable, but I personally wouldn’t recommend it. Want to see how you can really make a difference in school lunches? Go read Kim’s blog,The Yummy Mummy. Or watch the next season of Food Revolution. Visit your kid’s cafeteria and get involved. At the very least, pack them healthy homemade lunches that are fun enough for them to actually want to eat.
I was lucky when I was growing up – my mom always nt me off to school with an awesome lunch tucked inside my strawberry shortcake lunchbox. I never really liked sandwiches (I still don’t. Crazy, I know.) but she always came up with creative ideas that kept me happy. Wraps were always a popular choice, as was cheese and crackers. Sometimes I brought cereal and bought milk in the cafeteria. My favorite – especially in the cold winter months – was to bring a thermos full of soup. Even today, soup is one of my favorite lunches to pack myself to eat at work. This one is even better the next day, after the flavors have had a chance to mellow out and meld together. It’s buttery smooth and sweet, with a great nuttiness from the brown rice. Pack it up in a thermos or a mason jar (the next best way I’ve found to transport soup without spills). It sure beats canned spaghetti!
Chickpea and Wild Rice Mulligatawny
Prep Time: 5 minutes
Total Time: 30 minutes
Mulligatawny is a creamy Anglo-Indian soup flavored with chicken and curry. This version, with chickpeas, wild rice, and coconut milk, puts a new spin on the traditional soup. If you prefer a vegetarian soup, swap the chicken stock for vegetable stock.
Ingredients
- 1 tablespoon Butter
- 1 Leek, sliced into half moons
- 2 stalks Celery, chopped
- 2 Carrots, peeled and chopped
- 4 cups (32-ounces) Chicken Stock
- 1 (15.5 ounce) can Coconut Milk
- 1 (15.5 ounce) can Chickpeas
- 1 Apple, peeled and diced
- 1 tablespoon Curry Powder
- Juice from 1 Lemon
- 1/4 teaspoon Cayenne Pepper (Optional)
- 1/2 cup Wild Rice
- 1/2 cup Plain Yogurt
Preparation
- Melt the butter in the bottom of a heavy stock pot set over medium heat. Add the leeks and cook for 2 minutes, or until just softened. Add the celery and carrots. Cook for 5 minutes, stirring occasionally.
- Add the chicken stock, coconut milk, apple, curry powder, lemon, and cayenne (if using). Simmer for 20 minutes, or until vegetables are tender.
- While the soup simmers, cook the rice according to the directions on the package.
- Remove from heat and stir the rice and yogurt into the soup. Adjust seasonings to taste. Enjoy!
This was a paid review for BlogHer Book Club but the opinions expressed are my own.
Baked Apple Cider Doughnuts
| September 25, 2011 | Posted by Lauren Keating under Breakfast, Cake and Pastry, Desserts, Fall |
Fall is officially here, which means one thing – it’s time for apple cider doughnuts! These doughnuts are one of my absolute favorite fall traditions. They’re light and airy and bursting with the warm flavors of cinnamon and nutmeg and the sweetness of perfectly ripe apples. At my favorite orchard, it’s not uncommon for the wait for freshly fried doughnuts to be over half an hour long. Luckily, they’re easy (and healthier!) to make at home – and you don’t need any special equipment. (Although if you read to the end, you’ll find a nice giveaway waiting for you.)
I keep seeing recipes for baked doughnuts that require a special “doughnut pan.” Sure, a pan makes a pretty, even, and smooth finished product – but it also takes up valuable space in the kitchen! No thanks. My freeform doughnuts might not be as pretty as the ones baked in a pan, but they taste the same. Just make sure to flour your work surface liberally; the dough is very soft and had a tendency to stick.
Baked Apple Cider Doughnuts
Yields 9 doughnuts and about 20 doughnut holes
Prep Time: 15 minutes
Total Time: 40 minutes
These light and fluffy doughnuts get extra flavor from finely diced apple folded into the dough. Quickly frying them in a pan after baking gives these doughnuts a crispy exterior without the added fat and helps the cinnamon and sugar coating to stick. These doughnuts are best enjoyed straight out of the pan – they tend to deflate a little after sitting too long.
You can purchase a special doughnut cutter or doughnut pan for neater looking doughnuts, but differently sized cookie cutters will also work. I used a drinking glass to cut my larger circles and a shot glass to cut out the holes.
Ingredients
- 1/2 cup Apple Cider
- 2 tablespoons Butter, softened
- 1/4 cup (Approx. 2 ounces) Sugar
- 1 Egg
- 1/4 cup Milk
- 2 cups (Approx. 10 ounces) All Purpose Flour, plus additional for dusting
- 1 teaspoon Baking Powder
- 1/2 teaspoon Baking Soda
- 1 teaspoon Cinnamon
- 1/4 teaspoon Nutmeg
- 1/4 teaspoon Salt
- 1 Apple, cut into a 1/8-inch dice (about 1 cup)
- 1/4 cup Oil for frying
- Cinnamon and Sugar for dusting
Preparation
- Pour the apple cider into a small pan set over high heat. Bring to a boil and allow to reduce by half. Set aside to cool.
- In a mixing bowl, cream together the butter and sugar. Beat in the egg, then mix in the reduced cider and milk.
- In a separate bowl, combine the flour, baking powder, baking soda, cinnamon, nutmeg, and salt. Stir half of the flour mixture into the wet ingredients. Fold in the diced apple, then mix in the remaining flour.
- Generously flour a one foot square piece of parchment paper or aluminum foil. Turn the dough out onto the paper. Flour the top of the dough and use your hands to press/flatten it into a 1/2-inch thick disk. Chill for 15 minutes to help the dough firm up.
- Heat oven to 425F. Remove the dough from the fridge and cut into doughnut shapes using a doughnut cutter, cookie cutters, or a glass. Cut additional “holes” from the scraps of dough left over.
- Carefully transfer each doughnut and the “holes” to a baking sheet likes with parchment or a silpat. Bake at 425F for 10 minutes.
- Optional: For a crispier exterior, heat the oil in shallow frying pan until very hot. Cook doughnuts for 10 seconds on each side, or until lightly browned. Dust with cinnamon and sugar while they are still hot. Enjoy!
Have you ever thought about how your measure your flour? Some people use a spoon to fill their measuring cup, while others (including me) prefer to dip their cup right into the flour sack. Believe it or not, measuring these ways actually gives you different amounts of flour! That’s why so many recipes for baked goods include weight measurements. For the most part, an extra ounce of flour won’t hurt your recipe, but sometimes it can make a difference. That’s why a kitchen scale can come in handy.
I personally don’t bother with a scale most of the time, but it is a nice tool to have. In addition to using it for baking, I often buy big cuts of meat and divide them into smaller portions myself (it’s a lot cheaper!). With a scale, I can make sure my portions are appropriately sized. A while back, I was sent an EatSMart Precision Pro scale to try out. My old scale had just died, so it was perfect timing. I’ve used the scale a few times, and I have to say that I’m pleased with it. I especially like that the display is nice and big and stick out in the front a little so that you can read it easily – that was a problem with my old scale. The only complaint that I have about it is that the shiny silver top gets dirty the second that you touch it. This is a common problem with kitchen scales that I’ve seen, but I never understood why they don’t design them in a way that they don’t get all gunky!
Do you want to win a scale of your own? EatSmart has agreed to send one to one of my readers (US shipping addresses only). To enter, “Like” EatSmart on Facebook and leave a comment here letting me know that you did. I’ll pick a winner on Thursday, September 29.
Jalapeno Popper Mac and Cheese
| September 18, 2011 | Posted by Lauren Keating under Indulge, Pasta and Noodles, Quick Weeknight Meals, Shawn's Favorites, Sides, Vegetarian or Vegan |
This jalapeno popper macaroni and cheese is probably the best thing that’s ever come out of my kitchen.
There’s not much more to say about it than that. I mean, I could go on about how how rich and creamy and cheesy it is. How the thick sauce that clings to each piece of pasta tastes like someone just squeezed the guts out of your favorite bar poppers and called it “sauce.” How I kept running back to the kitchen as I waited for the pasta to finish cooking because I couldn’t stop sneaking tastes.
Or I could tell you how even though I lightened it up by using vegetable stock instead of cream and reduced fat cheese* instead of full fat cheese, it’s still some of the richest macaroni and cheese I’ve ever tasted. While I certainly wouldn’t call it health food, it’s healthier than most homemade macaroni and cheese. And definitely healthier than eating a plate full of fried jalapeno poppers for dinner.
Seriously, I might as well just stop cooking, because I don’t know if I’ll ever top this one. So I’ll just say this: make this ASAP. You can thank me later.
*Repeat after me: fat free cheese is evil. If you try to use that instead of reduced fat, I take no responsibility in your results. If you want to use full-fat cheese be my guest, but Cabot makes a very nice 50% reduced fat cheddar and pepper jack that melts beautifully and tastes like the real deal.
Jalapeno Popper Mac and Cheese
Prep Time: 20 minutes; Total Time: 30 minutes
Serves 4
This rich macaroni and cheese captures all the flavor of the jalapeno poppers at your favorite bar or pizzeria — right down to the crispy topping — but without the guilt. This dish has a kick; to prevent it from being too spicy, be sure to remove all of the seeds as well as the white veins from the inside of your jalapenos. I like to use a blend of cheddar and pepper jack, but you can use all cheddar if you prefer.
Ingredients
- 4 ounces dry Radiatore or other small, ridged pasta (elbow or shell shapes also work well)
- 1 slice Bacon, diced (optional)
- 1/4 cup diced Red Onion
- 1 clove Garlic, minced
- 8 Jalapeno Peppers, seeded and sliced
- 2 Tablespoons Flour
- 1 cup Vegetable Stock
- 4 ounces Reduced Fat Sharp Cheddar Cheese, shredded
- 4 ounces Reduced Fat Pepper Jack Cheese, shredded
- 4 ounces 1/3 Less Fat Cream Cheese, cut into cubes
- 1/4 cup Bread Crumbs
Preparation
- Preheat broiler. Bring a large pot of salted water to a boil. Cook pasta according to directions on the package. Drain and set aside.
- While the pasta cooks, prepare the sauce. Add the bacon, if using, to a wide bottomed pot over medium heat. Cook until crisp — about 7 minutes. Remove the bacon, leaving behind any drippings, and drain on a paper towel.
- Add the onion and garlic to the bacon grease and cook until softened — about 3 minutes. (If not using bacon, cook the onions and garlic in 1 Tablespoon of olive oil instead.) Add the jalapenos and cook for another 3 minutes. Stir in the flour. Cook for 1 minute, then add the vegetable stock. Simmer for 5 minutes.
- Slowly stir in the Cheddar and Pepper Jack cheeses, adding a little at a time and letting it melt completely before adding more. Stir in the cream cheese. Mix in the crumbled bacon, if using.
- Combine the cooked pasta and cheese in a shallow baking dish. Sprinkle a thin layer of bread crumbs over the top. Broil 3-5 minutes, or until bread crumb topping is crispy and golden brown.
Ground Chicken and Eggplant Lettuce Wraps
| September 15, 2011 | Posted by Lauren Keating under Asian, Chicken and Poultry, One Pan, Quick Weeknight Meals |
Are you sick of eggplant recipes yet? It’s my third one so far this month, but I’m surprisingly not tired of it yet! It really is a versatile vegetable. Tired of it or not, this is the last recipe from my collection of 5 New Eggplant Ideas that I’ll be posting here on this blog. If you want to see out the rest of the collection (which includes a fabulous recipe for eggplant stuffed with picadillo) you’ll have to check it out over on Tablespoon.com.
This recipe for ground chicken and eggplant lettuce wraps was inspired by the menu at P.F. Changs. They have a similar chicken and eggplant dish that’s one of the best things I’ve ever ordered at a Chinese restaurant. My recipe is pretty different from theirs, but it captures my favorite components of the original — especially the contrast of sweet, spicy, and salty flavors and the way the tender eggplant practically melts in your mouth. Adjust the amount of chili paste to suit your desired level of spiciness, or leave it out and allow each diner to add it directly to their own portion to accommodate a variety of tastes.
My favorite way to eat this dish is wrapped in crisp leaves of iceberg lettuce. It adds a great fresh flavor and a lightness to the heavier, fragrant filling. Plus it’s fun! Of course, if lettuce wraps aren’t your thing, it’s also great over steamed white or brown rice.
Gingersnap S’mores from The Cookiepedia
| September 11, 2011 | Posted by Lauren Keating under Cake and Pastry, Desserts, Fall, Indulge, Reviews, Winter |
It’s no secret that I love cookies. Ever since I was kid, they’ve been my favorite dessert (okay, they might be ties with ice cream as my favorite). Mom had an old cookbook devoted entirely to cookies that was always fun to look through. Every holiday season, we’d pull it out and decide what we wanted to make – they were all good. Unfortunately that book is long out of print (she got it at a yard sale, and it looked pretty old even then). So you can imagine my excitement when I found out that a new cookie-themed cookbook was coming out, right in time for cool autumn nights that call for fresh from the oven cookies.
The Cookiepedia, by Stacy Adimando definitely doesn’t disappoint. First off, the book is adorable! From it’s brown paper bag cover to the bright colors and cute illustrations to the spiral binding that lays flat on the counter, this book is really nicely put together.
The recipes themselves range from classics (chocolate chip, pecan sandies) to fancier recipes (cornmeal cookies with rosemary, French macarons) arranged into chapters like “buttery,” “chocolaty,” and “spicy.” Each recipe has tips, twists and variations, and a place to record your own notes. Like I said, the design is really nice – you can tell they put a lot of thought into how it was laid out.
The recipes are short, easy to follow, and for the most part can be made with ingredients that you probably have on hand. And they’re good. Really good. The chocolate sandwich cookies with cream filling taste like the best Oreos you’ve ever imagined. I may or may not have eaten half a batch of the gingersnaps in one sitting. The pistachio butter cookies are stroke of pure genius (like peanut butter cookies, but better).
My only complaint about The Cookiepedia is that there are only 50 recipes. I can only hope that there’s a sequel in the works.
Gingersnap S’mores
Prep Time: 10 minutes
Total Time: 1 hour
On their own, these gingersnaps are crispy, spicy, and reminiscent of graham crackers. They’re softer than the store-bought snaps, and so much better. Sandwiched with marshmallow fluff and sipped in chocolate, they’re the perfect treat to usher in the cooler weather. Unbaked dough keeps well in the refrigerator and can be frozen.
Recipe from The Cookiepedia is reprinted with permission from the publisher.
Ingredients
- 3 cups All Purpose Flour
- 2-1/2 teaspoons Baking Soda
- 1-1/2 teaspoons Ground Ginger
- 1 teaspoon Cinnamon
- 1/4 teaspoon Black Pepper
- 1/4 teaspoon Salt
- 1 cup unsalted Butter, at oom temperature
- 1/4 cup Sugar
- 1/4 cup Light Brown Sugar
- 1 Egg
- 1/3 cup Molasses
Preparation
- Sift flour, baking soda, spices, and salt into a bowl and set it aside.
- Cream the butter and sugars on medium spee for several minutes until smooth, light, and fluffy.
- Beat in the egg, then molasses, and mix again. The dough will start turning a lovely brown color.
- Mix in the flour mixture one-third at a time. Turn out the dough on a lightly floured surface. Roll the dough into two 9-inch logs. Wrap in foil and refrigerate for at least 30 minutes, or until firm enough to slice.
- Grease several cookie sheets. Using a sharp knife, cut sliced 1/4 to 3/8 inch thick. Place on cookie sheet and sprinkle the tops with additional sugar.
- Bake at 350F for 6 to 10 minutes, until set but not browned. Cool sheets for a few minutes before moving cookies to a wire rack.
- Once cooled, sandwich two gingersnaps with a small dollop of marshmallow fluff. Dip in melted chocolate that has been cooled slightly.
Roasted Eggplant & Red Pepper Dip
| September 7, 2011 | Posted by Lauren Keating under Light, Shawn's Favorites, Sides, Vegetarian or Vegan |

The first time I made baba ganoush was almost exactly two years ago. Since then, I don’t think a month has gone by that Shawn hasn’t asked me to make it again. I don’t blame him; the stuff is good! Roast eggplant is the perfect base for a creamy, low fat dip.
I knew that I wanted to use this technique in the collection of 5 New Eggplant Ideas that I created for Tablespoon.com, but I also wanted to put a new twist on it. I swapped out the tahini and cumin for roasted red peppers and smoked paprika. The resulting dip had a velvety texture and a sweet, smokey flavor. It didn’t resemble baba ganoush at all, but it was just as delicious.
Serve this eggplant and red pepper dip with flatbread crackers or vegetables, or use it as a sandwich spread or over pasta. Leftovers (if you have any!) will keep in the refrigerator for about three days.


Comments